Contents
This is a basic practical project using Arduino. You can follow this article to make this project your own. All explaination are given along with the source code.
Arduino is an open-source computing platform which used for building electronics projects. It consists of a physical programmable circuit named microcontroller and a software IDE. Arduino is used for reading sensors and control things like motors, lights, etc….. Arduino Integrated Development Environment or Arduino Software(IDE) contains a text editor that is used to write coding. It also contains a text console, a message area, a toolbar with buttons for a series of menus, and common functions. It will connect to the Arduino and the Genuino hardware to communicate with them and upload its programs.
The programs that are written using Arduino Software(IDE) are called sketches. These sketches are usually written in a text editor and are saved with a file extension. The text editor provides you the features like copying/pasting and searching/re-texting. A message area provides you the feedback while saving and exporting the sketches and also displays the errors so that we analyze. The text console with the help of Arduino software(IDE) displays the text outputs along with complete errors and other information. The toolbar buttons help and will allow you to verify and upload programs, create and open the saved sketches and also the serial monitor.
About the project :
When we go out for a vacation for a few days then we bother about our plants which are present at our home because until we return those plants will be left without water. So to sort out this problem we can go for an Automatic Plant Watering System using Arduino Uno.
In this system or project, the soil moisture sensors sense the moisture level in the soil and automatically switch on the water pump accordingly to supply water to the plants.
Components required :
- Arduino UNO and Genuino UNO
- 1N4007- High Voltage and High current rated diode
- General Purpose Transistor NPN
- Male/Female jumper wires
- Resistor 221 ohm
- 5V DC Motor
- Water tube
- Glue gun
- Weter container
- Breadboard
- Soil moisture sensor
Apps and Online services for reference :
Arduino IDE
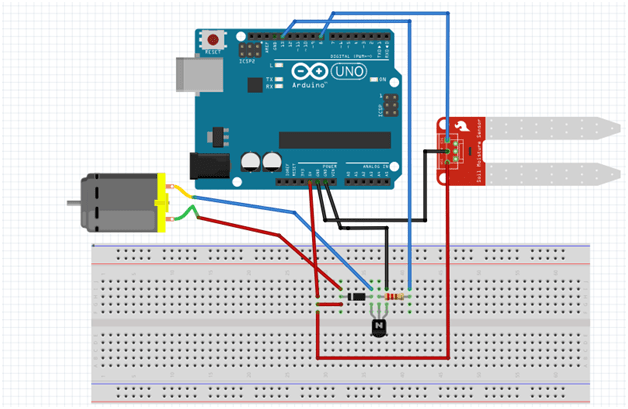
Circuit diagram of the system :

Black colored wires are used for underground. Red-colored wires are used for VCC. Blue colored wires are used for Arduino inputs
Circuit description :
1) DC motor using a water pump
In this system, we use a DC motor for the water pump. Generally, you can use a 12-volt water pump but to operate it you need a relay module. So to reduce this hardware complexity you can use a 5-volt DC motor based water pump using a diode, transistor, and forms a combined circuit that will operate the DC motor according to the Arduino code.
DC motor has two leads among which one is positive and the other is negative. If you connect the DC motor leads directly to the Arduino board then it will lead to the damage of the board. To avoid this problem, you can use an NPN transistor which helps to control the switching activity of the motor according to the given code.
To turn on and off the transistor, use the Arduino pin 13 which is named WATERPUMP in the code. According to the code, in the serial monitor, we need to enter a value between 0 to 225 to control the speed of the motor. For the speed of the motor, 200 value is preferred to be the best for entering in the code.
2) Soil moisture sensor
To measure the volume of water content and moisture content in the soil, the soil moisture sensor is used which has two leads. These leads of soil moisture sensor allow the current to pass through the soil and in return calculates the value of resistance to measure the moisture and water level in the soil. The water level in the soil is directly proportional to the electricity conducted by the soil. If there is more water in the soil then the soil will conduct more electricity. This means that high resistance value along with a low level of moisture. In the same way, if there is less water in the soil then the soil will conduct less electricity. This means that low resistance value along with a higher level of moisture in the soil.
Code:
int WATERPUMP = 13;
//motor pump connected to pin 13int sensor = 8;
//sensor digital pin connected to pin 8int val;
//This variable stores the value received from Soil moisture sensor.void

setup() {      pinMode(13,OUTPUT);

Serial.println("Speed 0 to 255");
}


 void loop()  {
if (Serial.available())
//loop to operate motor
{
     int speed = Serial.parseInt();
      // to read the number entered as text in the Serial Monitor                     if (speed >= 0 && speed <= 255)
 {
           analogWrite(WATERPUMP, speed);
            // tuns on the motor at specified speed
  }
}
   val = digitalRead(8);
   //Read data from soil moisture sensor

   if(val == LOW)
   {
           digitalWrite(13,LOW);
           //if soil moisture sensor provides LOW value -
           // - send LOW value to motor pump and motor pump goes off          } else{
               digitalWrite(13,HIGH);
        //if soil moisture sensor provides HIGH -
       //- value send HIGH value to motor pump and motor pump get on            }
    delay(400);        //Wait for few second and then continue the loop.

}
Next Read:

My name is Vemula Chandana. I am from Hyderabad , and currently pursuing my BTech degree in Electronics and Communication Engineering in Anurag University.

Leave a Reply